Sunday, April 10, 2011

I hate life

So I was almost done, and the autosave thing said it was saved, so when I had to go, I just closed it. And it didn't save. So I have to restart. yea. life sucks.

The beginning of chem was fun, because we watched Steven Colbert singing "Friday" for some fundraising thing. And then we talked about weird stuff like farms.

But then we learned. Like scientifical stuff.

First was equilbrium. Basically it occurs when a reaction is going forward at the same rate its reverse reaction is going. So if we have a reaction A --> B, we would reach equilibrium if A's were changing into B's at the same rate that B's were changing into A's. Thus we can determine, that once we reach equilibrium, the total number of A's and B's, or their concentration, will not change, though they may not necessarily be equal.

Ok. so that was easy.

This part is shaky for me.

So for the equation: aA + bB < - > cC + dD, where the little letters are coefficients and the big letters are gases, we can get this equation:
definekp.gif

Ok, so that's kinda not really simple. why is my font bigger. Ok, now it's too small. That bothers me.

So the PA-D 's represent the pressures of each of the gases. Then they are raised to the power of their respective coefficients. And from there it's pretty straight forward.

We also get this other equation:

Kc = [C]c[D]d/[A]a[B]b

The brackets here around the letters mean "the concentration of". So [C] means the concentration of gas C. It is essentially the same equation as before, only we use concentration instead of pressure.

Now we have an equilibrium pressure constant, and an equilibrium concentration constant, so now we relate them with yet another equation.

Kp = Kc(RT)^∆n

These should be familiar, we have the constants and the universal gas constant (.0821 L*atm/mol*K) and the change in moles of gas.

I am pretty sure the moles referred to is the total number of moles (moles of products - moles of reactants) but I could be wrong).

We have a WA due tomorrow. So get some sleep. and do it during lunch. and watch this:


Umm scribing tomorrow will be.. MOLLIE McAWESOME

Wednesday, April 6, 2011

The Ninja From Down Under


Today we had shortened classes and Mr. Liberman was not there. So, we had a sub and we got to watch Myth Busters! SWEAAAAAAAAAAAAT! This episode was the second one they have done on ninjas. They were retesting if a ninja could actually catch an arrow, but this time they had the most accomplished ninja in the world today who happened to be Australian. Adam and Jamie the two hosts talked about how that the speed of an arrow does not change on release from the bow to impact with its target. The first experiment was to see if the ninja could catch tennis balls going 80 mph's and he caught 22 in a row a Guiness World Record. Then Jamie tried to accomplish this feat thinking it was being overplayed he was soon pelted relentlessly with thennis balls quite amusing. Next, Carry, Grant, and Tory tested the old assination technic that ninjas would lay in wait in river banks breathing out their blow guns and then using them to kill their target. First they checked how long Tory could stay underwater with out suffering hypothermia and he felt he could last about an hour. Next they tested if they used an all natural blow gun how their aim would be. Tory and Grant made all natural ones but they accuracy was pitiful. Next, Carry who cheated by putting a metal rod in had perfect accuracy. Next she sat underwater and had to deal with the refraction of the water to hit the target. Eventually she go the hang of it. Next they tried to put all the aspects together breathing through it, being cold, and having to transfer the dart in. The myth was busted because no one could load the dart without shooting it with water. Back to Jamie and Adam they put their ninja to the test when he caught an arrow then they put him between three archers and at first he could not do it. Eventually when they moved back and the one who had to shoot had to draw his bow the ninja caught it. The next segment was supposed to be the one inch punch but we did not get to it. Thats it the next scrib is Matt Park

Tuesday, April 5, 2011

The Slimy Blue But Also Clear Stuff Lab

Hiiiii guys! Alright so if you were sick today (Colleen) you missed out on another wonderful lab. The point of this lab was to figure out the different factors that affect reaction rates. Sadly, this lab was incredibly long and we did not have time to finish it today, but my group did make it through part one..or A, whatever you want to call it.

This part of the lab was testing the effect of temperature on reaction rates, and the reaction we were observing was between the slimy blue solution and oxygen. When the solution reacts with oxygen, it turns clear, when it is not reacting with oxygen it is blue.


By shaking the solution in the pipette, we were re-oxidizing the solution and caused the methylene blue color to appear. Once the solution was put to rest, it settled and the glucose in it reduced and it became clear again. This reaction time was measured at four different temperatures (in degrees Celsius ) : 10, 20, 30, and 40. My group's data looked like this:
Using this, we concluded that as temperature increased, the rate of reaction increased as well (which you might notice is the CLAIM part of your conclusion, you're welcome.) So, that was basically what we did today, we are going to finish the second part of the lab tomorrow. And the lucky person who gets to write about that is......Brandon L! Have fun Brando!

Colliding into Activation Energy

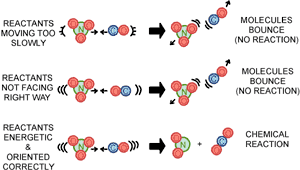
By: Emilio I. April 4th was the first day back from Spring Break so we began a new unit, unit 11: Kinetics and Equilibrium. We started off by talking about the collision theory and how a chemical reaction can not occur if the reactions do not collide. Mr. Lieberman used the example that if two substances are on opposite sides of a container, they cannot react at all! This is true because when molecules collide they transfer kinetic energy and break the bonds that hold other molecules together.
Kinetic energy is half the battle, the other half is having correct orientation. In order for a reaction to occur between molecules, specific atoms must crash into eachother at specific speeds. Here is an image describing the idea behind orientation and chemical reactions:
The Kinetic energy required to break the bonds in a molecule and cause a chemical reaction is known as the Activation Energy. It is also referred to as the Activated Complex. It is at the top of the graph showing a reaction's energy, just like this one: We only discussed one way to increase the speed of this type of reaction, although there are many ways to do this. The one we discussed is by adding a catalyst that lowers the activation energy which allows a higher number of reactions to occur among the molecules in the reaction. The catalyst is not a part of the reaction, though, so it will not appear in the reactants or products. The next Scribe will beeeeee: Kaitlin S. Goodluck

Wednesday, March 23, 2011

Colligative Properties Lab


Today in Chemistry we did the Colligative Properties Lab. The goal of this lab was to use boiling point elevation data to identify an unknown salt. We began by labeling four 100 mL beakers A,B,C, and D and recording their masses in our super neat data tables. Next we filled each of the beakers about half full with distilled water. We recorded the mass of the beaker and water in our data table. We then placed the beakers full of water on the hot plate and heated them to about 85°C at which point we removed them from the hot plate. We determined the boiling point of the water in beaker A by noting the plateau on our lab pro. We recorded this number and proceeded to add about 5.0 grams of the unknown ionic solid to beaker B. We placed it on the hot plate and recorded its boiling point in our data table. We then added about 10.0 grams of the unknown solid to beaker C. We placed it on the hot plate and recorded its boiling point once again. Finally we added 15.0 grams of the unknown solid to beaker D, placed it on the hot plate, and recorded its boiling point in our data tables.

As a part of the data/calculations we were asked to calculate the molality of each solution and were given the molal boiling point elevation constant: 0.51°C kg/mol. To calculate the molality of each solution, we used the equation ΔTb = Kb · m · i. To calculate change in temperature, we subtracted the boiling point of beaker A from beaker B, beaker B from beaker C and so on. We were told the ionic sold has 2 ions, so i=2. We plugged these values into the equation and solved for m to get a value for molality.

To calculate the moles of solute in beakers B, C, and D, we used the molality equation which says that molality = mol solute / kg solvent. We have the value for molality and to find the kg of solvent we simply subtracted the mass of the beaker from the mass of the beaker and water and divided the answer by 1000 to obtain the value in kilograms. To find the moles of solute, we multiplied the molality by kg solvent.

To find the molar mass of the solute in beakers B,C, and D we divided the number of grams of solute in each mixture by the moles of solute obtained in the previous step. We added 5.0 grams to beaker B, 10.0 grams to beaker C, and 15.0 grams to beaker D. These values were divided by the moles solute to obtain the molar mass of the solutes. To calculate the average of the molar masses, we just added them together and divided by three.

The conclusion asks you to decide the formula for the unknown solute, so choose the formula with the molar mass closest to your average. The choices are NaCl, KI, NaNO3 or NaBr. Support your claim with evidence and then calculate the percent error:

| actual value – theoretical value | x 100 %
theoretical value

The lab is due Friday and so are all of the worksheets and Webassigns. Study for the Test Friday!

The next scribe will be Emilio I!

Tuesday, March 22, 2011

Title

Today in the class of chemistry, we discussed colligative properties, which are properties that focus on the amount of particles in a solution and not their actual identities. There are 4 colligative properties, but we only need to know 3 of them: vapor pressure lowering, boiling point elevation, and freezing point depression. Osmotic pressure is the fourth. Vapor pressure change can be expressed by multiplying the vapor pressure of the solvent by the mole fraction of the solute. A change in boiling point can be calculated by subtracting the BP of the solvent from the BP of the solution. For freezing, do the opposite and subtract the FP of the solution from the FP of the solvent. We also had a demo where a bottle of unopened club soda was placed into a beaker of ice and salt in order to change its freezing point. After a few minutes, Mr. Lieberman took out the soda and opened it, causing it to instantly freeze and have the carbonation come bubbling out. That's about it for Tuesday March 22 in chem. Do the worksheets and webassigns for Friday and study for the test! The next scribe will be Zoe S

Monday, March 21, 2011

Stoichiometry Expanded

We first turned in our solubility labs from Friday. When then began our discussion, extending off the solubility problems. (Also we have a test on friday) Everything was mostly a review from stoichiometry 1st semester except for molarity and molality.

When then preceded to solve this problem for practice:

How much calcium carbonate will be precipitated by adding 25.0 ml of calcium chloride to 25.0ml of 56 M potassium?


I left out the ml to l conversation factor and the 1 to 1 mole conversation for the second equation above.

We also did the first problem of the worksheet.


Remember to keep doing those web assigns and worksheets for preparation for the test on friday!
The next scribe will be Ben T !

Saturday, March 19, 2011

Molarity vs Molality vs Molasses

On Friday we talked about the idea of molarity and molality. Molarity (M) is = to the moles of solute/liters of solution. Molality is not as common, as shown by the fact it is not in some dictionary. Molality is = to the mol solute / kilograms of solvent.
We then continued to solve some example problems of calculating concentrations. Take a look at your notes for some extra practice.
Molarity and Dilution
At the end we introduced the concept of Molarity and dilution, and established this formula
m1v1 = m2v2.

Here is a video walking through the conversation of Molality to Molarity.


Here doesn't sound very happy, but he is pretty concise. Also remember to do your webassigns and homework. Also molasses has no link to chemistry if you were curious,but they did come to mind.

Thursday, March 17, 2011

Heat, Cool and Repeat

Today we started off class by turning in our Solution Formation lab. (Mr. Lieberman also wants to know where his door stopper is...if anyone knows or finds it)

The rest of class was working on our new Solubility Curve lab (due Monday).
This took up the whole classtime and we even had to split up the work amongst our groups to get the job done faster. Essentially, we had two "series" to run, each with the same procedures but with different masses for the materials in the three test tubes.

In the first session, test tube A had to contain 0.45 to 0.50 grams of potassium nitrate (KNO3), test tube B had 0.70 to 0.80 grams, and C had to have 1.20 to 1.30 grams.
I massed each of these tubes and then with the KNO3. Then I massed each test tube with water added. From there, I placed each test tube into boiling water and stirred them gently (well actually, prodded at them more) to make the KNO3 dissolve faster. Once it was completely dissolved, I first took out test tube C and placed it in a beaker of iced water to make it crystallize. The temperature at which test tube C started turning white was recorded. This is the same as the saturation temperature. What was done to test tube C was then done for the other test tubes.

The second series (that was being tested at the same time) had test tube A massed at 0.35 to 0.40 grams, B with 0.90 to 1.00 grams and C with 1.50 to 1.60 grams. My partners then repeated the process I explained above.


<------(crystallized KNO3)


There are some calculations and a graph to do on the computer to go with this lab, along with the conclusion.
(There is also a Webassign due at 1:00 Friday.. just in case)
The next scribe will be.....Austin W.

Wednesday, March 16, 2011

Factors Affecting Solubility

I'm filling in for Michelle T.

Today was a notes day. We explored how certain conditions, specifically temperature and pressure, impacted the solubility of solutions. Each of these conditions affects their solute differently based on its state of matter; a solid, gas, or liquid.

An increase in temperature for solids and liquids results in an increase of solubility, as the intensified intermolecular motion allows for a more thorough interaction between the solute and solvent. However, higher temperatures in gases results in molecules being released to the atmosphere instead of contained within the solvent, resulting in lower solubility.

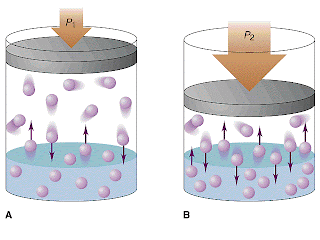
Pressure only changes the solubility of gases. Solids and liquids already have their molecules tightly packed so that an increase in pressure would not change the structure of the solute enough to change solubility. Gases are more prone to be altered by pressure because their molecules are more spread out. The increase in pressure forces the molecules of gas down into the solvent, increasing solubility.

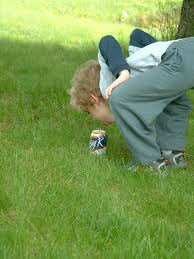
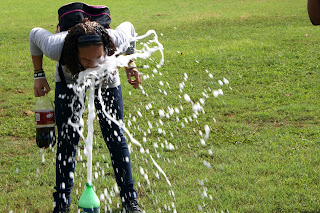
We discussed real world examples describing the relationship between pressure and solubility. Soda is kept under high pressure in its can. When that pressure is released when the can is opened, pressure no longer forces the CO2 molecules in to the soda. The CO2 rises to the top in the form of bubbles and thus, carbonation.

Here's some scientific photos to help explain:

BEFORE:


AFTER:


It seems as though a rapid decrease in solubility also has the side-effect of a spontaneous age, gender, and race change.

I guess the next scribe is Michelle T., to fill her duties from today.

Tuesday, March 15, 2011

Solution Formation Lab

Today was late arrival and we had shortened periods, which means we spent the whole period working with our lab groups on the solution formation lab. The goal of the lab was to determine the effect of crystal size, temperature, and degree of mixing on the solution formation. Each group had to develop their own procedures to test the three variables for a solution of copper sulfate disolved in water.


For our groups procedures, we kept all of the variables the same except for the one we were testing, in order to make sure the that change in results is because of the change on the variable that we controlled. For example, the first part of the lab was to determine how the size of the crystal effected the solution formation. By testing three different sized crystals of copper sulfate at the same temperature, our group got the conclusion that the larger the crystal, the longer it takes for it to dissolve.


The second part of the lab was to test the effect of the temperature of the solvent on the formation. Our group used water at three different temperatures and the same amount of copper sulfate, and by dissolving copper sulfate in all of them, we discovered that if the temperature is higher, the crystals will dissolve faster.


The last part of the lab was to test the effect of the degree of mixing on the formation the of the solution. To test this, our group mixed the solution with a stirring rod at different speeds but the same amount of copper sulfate and at the same water temperature. By keeping time, our group found that the faster you stir, the faster the crystals will dissolve.


So, that is pretty much it for our shortened class.
The conclusion part of the lab is for homework and it is due on Thursday.
The next scribe will be Michelle T.

Monday, March 14, 2011

Let Chemistry Absorb You. Ha.

Alright, boys and girls, this here's a chemistry post and it's about to get real.

Mr. Lieberman reviewed the test with us, like a boss, and gave us two points because of an error and because of leniency. Then he reviewed with us the basic principles of solutions.
  • A solute is the substance that is being dissolved
  • A solvent is the liquid in which the solute is dissolved
  • Solute dissolves in solvent
  • Aqueous = solution with water as solvent
Easy, right?

A saturated solution is a solution where the solute has dissolved into it at a maximum. No more solute can be dissolved in this saturated state.

In the notes that Mr. Lieberman explained in class, there is a diagram of NaCl dissolving in H2O showing the driving forces that cause the dissolving of this solute, NaCl, into this solvent, H2O (most of the solvents in this unit will be H2O and all of them will be liquids! Awesome!). In the diagram, the H2O molecules, which are polar, attach themselves to the Na+ or Cl- atoms according to polarity. So an H2O molecule's negative pole will attach to the positive Na atom. And an H2O molecule's positive pole will attach to the negative Cl atom. This will pull the crystal-like structures of NaCl apart. This is a demonstration of an ionic solute dissolving by dissociation into its ions. There are two more types: Covalent solutes dissolving by H-bonding to water and covalent solutes dissolving by London dispersion forces (LDF).
This process is carried out instantaneously, it cannot be viewed through a microscope or observed at all, for that matter.

Furthermore, there are three stages to this same solution process explained in further detail here.
  1. Primarily, there is the separation of a solute, and in order of this to happen, the solute's molecules must surpass their intermolecular forces (IMF) and it requires energy, making it endothermic.
  2. Secondly, the separation of a solvent occurs when the solvent overcomes its intermolecular forces. This also requires energy, also making it endothermic.
  3. Thirdly, the interaction of these two substances occurs. An attractive bond forms between the solvent and solute molecules and this releases energy, making it exothermic.
Phenominal! Now we understand the heat exchanges that occur within this process, let's continue!

We continued with the in-class notes and took a look at the factors affecting the solubility.
We know that Like dissolves like, which means that molecules with the same type of intermolecular forces will dissolve in eachother. E.g. dipole-dipole, Hydrogen bonds, and LDF.
Cool, huh?
Tell you what's not cool, that the raise of temperature in these solutions causes more collisions which allows easier access into these crystal structures, allowing for further saturation of a solution.
Finally, there is pressure. Solids and liquids are hardly affected by pressure changes in relation to solutions, but gas, under higher pressure, will have a higher solubility.

Well done, Captain, you have successfully acquired knowledge of solutions and can continue on your path to success. Enjoy your good HEALTH:


The next scribe is Becky N. (Rebecca N.)

Wednesday, March 9, 2011

Slam a revolving door


Chuck Norris can slam a revolving door
Besides from the obvious... today in class, first thing we did was review the forces. We reviewed the dispersion forces, dipole forces, and hydrogen bonding. for more information you can look below at Elim's post.
After our review, we started our lab.
This lab has 7 stations to observe trends and patterns in several properties of liquids and to use a model of intermolecular forces to explain the findings.

Station 1: Evaporation Rates
This station measured the rate at which the liquid evaporated. the rate that the liquid evaporates depends on the strength of the intermolecular forces between liquid molecules. liquids with the lowest evaporation rates have the strongest intermolecular forces.
Insert Photo here that I could not find

Station 2: Capillary Action
A liquid tends to climb up the walls of narrow columns, this is known as capillary action. This is based upon two forces: adhesive forces, and cohesive forces. The greater the cohesive strength, the more the liquid climbs the column. The greater the adhesive strength, the lesser the liquid climbs the column.


Station 3: Vortex Formation and Relaxation
If you swirl water, you get a water tornado. That's what this is, just making vortex's by swirling the liquids. The time it takes for a liquid to settle down from a swirl is different for all liquids depending on the intermolecular forces. the longer it takes to relax, the stronger the intermolecular forces are. We did this with three liquids: Water, Hexane, and Heavy oil.


Station 4: Viscosity or Resistance to Flow
Not every liquid flows at the same rate (compare water to waffle syrup). Viscosity is the property of a liquid which provides a measure of that liquids tendency to resist flow. Liquids with stronger intermolecular forces have a greater resistance to flow, a higher viscosity. We took the same three substances as station 3, and put them in test tubes. After that we timed the seconds of a marble falling to the bottom of the test tube. The faster it is, the lower the liquids tendency to resist flow, or the lower the Viscosity. The lower the viscosity, the weaker the intermolecular forces.

Station 5: Surface Tension
Molecules on the very surface of a liquid can form strong enough intermolecular forces between them to make their surface impenetrable. It's this surface tension (along with other factors) that make leaves floar on water. For this expirement, we had to lower a paperclip using a tray to try to make it float on the liquid. The liquid that the paperclip can most easily float has the greatest surface tension.


Station 6: Beading
Many liquids have a tendency to bead. For example water droplets that look circular, that is actually the water beading. This is cause by liquid molecules to form a strong intermolecular attraction with itself and curl into a spherical bead or droplet. The greater the strength of the intermolecular forces, the greater the tendency of the liquid to bead. If placed on a surface the liquid is attracted to, the liquids beads less. For this expirement we dropped droplets of liquids onto wax paper and our lab benches. We then made observations according to what beaded and what didnt.

Station 7: Freezing point and Boiling Point
unlike the other stations, this one was all on our packet. all liquids have a freezing and boiling point. These points depend on the strength of the intermolecular forces. Liquids with stronger intermolecular forces have higher boiling points. The graph on our paper is pretty straightforward if you just remember that.


Don't forget we have a ton of webassigns due on Friday as well as this lab.
This lab must also have a conclusion on a seperate piece of paper (though the data can all be in the packet).
The next scribe will be Emilio.

Tuesday, March 8, 2011

Polar and Non-Polar molecule

Today in chemistry class we started out by giving back pop quiz.
Mr. Liberman said most of us didn't understand about "stable."
When atoms are stable that means they don't want to bond or already bonded.
And he said we can't break octet rule except inside. In other words, outside of elctrons can't have electrons over 8.

After that he explaind about polar molecule and non-polar molecule by showing us a great demonstration.
He had two buret, a vertical cylindrical piece of laboratory glassware, that one has filled up with water and the other one has filled up with acetone.
By rubbing his hair with a balloon, that balloon has negatively charged.
As he moved the balloon close to the buret which has water, the flow of the water started to bend toward the balloon.  It happens because water is positively charged and it is polar molecule.
Theoretically, acetone has to be not bend but it did.  Mr. Liberman guessed the acetone mixed with water.
Anyway acetone can not be bend because it is negatively charged and non-polar molecule.

 + Non-Polar molecule
-charge is evenly spread out in the molecule
-NO NON-BONDING PAIRS

 + Polar molecule
-HAS NON-BONDING PAIRS
-the negatively charged center atom balances the molecule with positively charged outside of atoms

The main difference between non-polar and polar molecule is that non-polar molecule does not have non-bonding pairs and polar molecule has non-bonding pairs.

To determine polarity you should look for non bonding pair.

Mr. Liberman also explained different kind of forces-intermolecular, dispersion, and dipole forces.

Every molecules have intermolecular and dispersion forces.
Dispersion force is not that strong force but attractive.
Bigger molecule has lots of dispersion forces.
When he sprinkled acetone on his hand it disappeared very quickly but water did not.
This is a demonstration of dispersion forces.
Also we learned about hydrogen bonding which is strongest force.

I am really sorry that I couldn't explain very well..
So if you need more information about this stuff, I recommend you to visit here:
http://www.tutorvista.com/chemistry/difference-between-polar-and-nonpolar-molecules

And just a reminder, we have a lot of webassign to do.
Also we have a test on Friday.
The next scribe will be Alex K.

Sunday, March 6, 2011

Sharing is Caring

Today, Mr. Lieberman had a pack of sour patch kids. He shared them with Zoe by giving her 1 of them and eating the rest. With a second pack of candy, he gave half to Zoe and the rest he ate. With a third, he gave the whole pack to Katie, taking none for herself. We learned that Mr. Lieberman was sharing his candy as molecules share electrons.
First, we learned about polar and non-polar. These are only between 2 nonmetals.
Polar covalent bonds are where electrons are not shared equally between molecules, and the electronegativity difference is between 0.4 and 1.7.
Non-polar covalent bonds are where electrons are shared equally between molecules, and the electronegativity different is between 0 and 0.4.
An example of a non-polar covalent bond is C-C. It is said to be like "tug of war with your twin". No one would win and the forces trying to win, or gain the electrons are equal, so the electrons would be shared equally. The electronegativity for the two atoms are the same, so they are equally pulling for the electrons. This is the scenario where Mr. Lieberman gave half his candy to Zoe and kept half for himself.
An example for a polar covalent bond would be C-F. The electronegativity for fluorine is strong than that of carbon, and therefore, there is an unequal share of electrons, because flourine would be winning the game of tug of war with carbon. Fluorine becomes more negative because the electrons are closer to fluorine than carbon, even though they are still shared with carbon, so that would mean fluorine is partially negative. Carbon has less of a pulling force on the electrons so it is partially positive. The opposite ends (+ and -) create a dipole. This is the scenario where Mr. Lieberman gave one piece of candy to Zoe and ate the rest.
Ionic bonds are where one molecule gets all the electrons, having a complete transfer, even though this is considered sharing. The electronegativity of one nonmetal atom is so much greater than the other metal atom that it pulls the electrons away. This is the scenario where Mr. Lieberman gave all his candy away to Katie.
We also had a pop quiz at the end of class.
Have a great rest of the weekend everyone!
~Kaitlyn Y.
The next scribe will be Elim.

Thursday, March 3, 2011

Build the Big Ones Lab

Today in class we finally got to a a lab! It was called Build the Big Ones. The big ones refers to molecules with more than one central atom. The molecules we worked with were ethanol, acetic acid (vinegar), serine, and styrene. We had to build each molecule using spheres, wooden sticks , and metal springs. The wooden sticks represented a single bond and the metal springs represented double bonds. As explained in the directions, a black sphere is carbon, a yellow sphere is hydrogen, a red sphere is oxygen, and a light blue sphere is nitrogen. Here are the pictures for each molecule:

ethanol
ethanol

acetic acid
acetic acid

serine
serine

styrene
styrene

For each molecule we had to determine the central atom, the geometry of the atom, an example would be tetrahedral, the bond angle for that geometry and the hydridization. Here is what me and my partner Katie I. cam up with: build the bog ones 009

Lastly, we had to do our conclusion for the lab and if any of you had trouble, this is the conclusion Katie and I came up with:build the bog ones 011

I hope our data table and conlcusion help! Well that was all we did in period 6 today.
The next scribe is......................................Kaitlyn Y.

Wednesday, March 2, 2011

Continuation on Electron Pairs and Start of Hybridization

To start off class today, we first discussed the types and names of the electron pairs we learned yesterday (In Ethan's Post). Next, we moved into looking at 4,5, and 6 areas of concentration. These are the highest levels of concentration that can ever happen in an atom.

The first molecule that we looked at for the day was PF5. PF5 has 40 valence electrons and using this, we constructed the Lewis structure. Phosphorus can break the octet rule, which is the only reason why this Lewis Structure works. Then we used that to help us form the angles at which the balloons in the demonstration were forming(90,120,180). PF5 is an example of a trigonal bipyramid molecule. We then did the same steps for the Octahedron molecule of SF6. Sulfur can also break the octet rule.

During the demonstrations of the shapes of how these molecules would look like if they were much bigger, we also saw how the non-bonding pairs of atoms continuously took away an equatorial angle, instead of a linear angle. This happens because this is the most stable configuration.

The Last thing we learned about for the day was hybridization. Hybridization is the mixing of one s orbital and one p orbital in order to produce two sp orbitals. We looked at a video that explained the different formations as well as the actual action of what it would look like. . That is all we learned.

The next scribe is...Deena M.

Tuesday, March 1, 2011

My. Last. Post. Heck. Yeah. It's on 3D Molecular Design.

So we thought we were done. The Lewis Structure was the life, being able to show how atoms were bonded. But guess what, my friends? You don't live in a 2D world made by 2D atoms. Otherwise, you'd look like this:
So how does this work? Well atoms form bonds, as I covered yesterday. They do this in a 3D manner. Let's begin with what we learned today:
Linear Bonds: are bonds that use all the electron pairs in the valence level, there are no "free" electrons. These have a 180 degree angle.
Next, we have the Trigonal Planar Bond, which is the same as above except with three bonds. The angle measure is 120 degrees:
Sorry for the large image size. Next, we have Tetrahedral Bonds, with 4 bonds and an angle measure of 109.5 degrees:
Finally, we have the Bent Bonds, which have electron pairs in place of bonds. This causes the angles to change, and the shape to "bend". The molecules with 2 bond pairs have 120 degrees, the ones with 3 have around 107 degrees.
Now, the moment you've all been waiting for.... BEN A. will be my replacement after my long tenure as writer. Thank you and have a nice day.


Monday, February 28, 2011

an old friend

just wanted to say hello. hello.

Resonance (My Second to last post!!!:))

So we all get covalent bonding now? As I detailed in my last post, there some easy ways to draw the Lewis Dot Diagram (click the link or scroll down the blog for the deets). However, just when we think everything is hunky-dory, Liebs decides to throw a big ole monkey wrench in the mix. And while Resonance isn't rocket surgery, it can still seem a bit complicated. To make it less complicated, I will give you a great song about a great dancer that has absolutely no revelance to chemistry whatsoever:


Keep the jeep rolling people! Now, back to resonance. For an overview, the Wikipedia is a good starter:
In chemistry, resonance or mesomerism [1] is a way of describing delocalized electrons within certain molecules or polyatomic ions where the bonding cannot be expressed by one single Lewis formula. A molecule or ion with such delocalized electrons is represented by several contributing structures


A few of these words may be a bit complicated. Therefor, I will expand upon it in a simpler manner:
Basically, Resonance happens when there are two different bond types when between 3 or more atoms of 2 elements. For example, let's say you have the element NO2-. Well, if you did the Lewis dot structure, you would get this result:

Notice that there is one double bond, and one single bond. Well, for reasons unbeknown to me, this is not how the element really exists. Instead, they exist in a way that is "in between" (Liebs described it as "one and a half" so it's easier to visualize, though it is not technically one and a half). Therefor, this is how they should be drawn:
File:Stickstoffdioxid.svg

Well, that's what we learned today. For the remaining time, we were generously given time to work on our worksheets. Whether you used it wisely (and you can assume if I did or not) is up to you. So basically yeah. I'll be back tomorrow. Stay Classy HCPER61011.