Showing posts with label Mr. Lieberman. Show all posts

Wednesday, April 6, 2011

The Ninja From Down Under


Today we had shortened classes and Mr. Liberman was not there. So, we had a sub and we got to watch Myth Busters! SWEAAAAAAAAAAAAT! This episode was the second one they have done on ninjas. They were retesting if a ninja could actually catch an arrow, but this time they had the most accomplished ninja in the world today who happened to be Australian. Adam and Jamie the two hosts talked about how that the speed of an arrow does not change on release from the bow to impact with its target. The first experiment was to see if the ninja could catch tennis balls going 80 mph's and he caught 22 in a row a Guiness World Record. Then Jamie tried to accomplish this feat thinking it was being overplayed he was soon pelted relentlessly with thennis balls quite amusing. Next, Carry, Grant, and Tory tested the old assination technic that ninjas would lay in wait in river banks breathing out their blow guns and then using them to kill their target. First they checked how long Tory could stay underwater with out suffering hypothermia and he felt he could last about an hour. Next they tested if they used an all natural blow gun how their aim would be. Tory and Grant made all natural ones but they accuracy was pitiful. Next, Carry who cheated by putting a metal rod in had perfect accuracy. Next she sat underwater and had to deal with the refraction of the water to hit the target. Eventually she go the hang of it. Next they tried to put all the aspects together breathing through it, being cold, and having to transfer the dart in. The myth was busted because no one could load the dart without shooting it with water. Back to Jamie and Adam they put their ninja to the test when he caught an arrow then they put him between three archers and at first he could not do it. Eventually when they moved back and the one who had to shoot had to draw his bow the ninja caught it. The next segment was supposed to be the one inch punch but we did not get to it. Thats it the next scrib is Matt Park

Tuesday, April 5, 2011

Colliding into Activation Energy

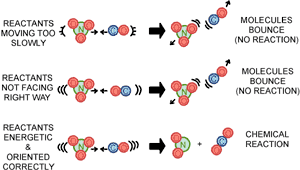
By: Emilio I. April 4th was the first day back from Spring Break so we began a new unit, unit 11: Kinetics and Equilibrium. We started off by talking about the collision theory and how a chemical reaction can not occur if the reactions do not collide. Mr. Lieberman used the example that if two substances are on opposite sides of a container, they cannot react at all! This is true because when molecules collide they transfer kinetic energy and break the bonds that hold other molecules together.
Kinetic energy is half the battle, the other half is having correct orientation. In order for a reaction to occur between molecules, specific atoms must crash into eachother at specific speeds. Here is an image describing the idea behind orientation and chemical reactions:
The Kinetic energy required to break the bonds in a molecule and cause a chemical reaction is known as the Activation Energy. It is also referred to as the Activated Complex. It is at the top of the graph showing a reaction's energy, just like this one: We only discussed one way to increase the speed of this type of reaction, although there are many ways to do this. The one we discussed is by adding a catalyst that lowers the activation energy which allows a higher number of reactions to occur among the molecules in the reaction. The catalyst is not a part of the reaction, though, so it will not appear in the reactants or products. The next Scribe will beeeeee: Kaitlin S. Goodluck

Monday, March 14, 2011

Let Chemistry Absorb You. Ha.

Alright, boys and girls, this here's a chemistry post and it's about to get real.

Mr. Lieberman reviewed the test with us, like a boss, and gave us two points because of an error and because of leniency. Then he reviewed with us the basic principles of solutions.
  • A solute is the substance that is being dissolved
  • A solvent is the liquid in which the solute is dissolved
  • Solute dissolves in solvent
  • Aqueous = solution with water as solvent
Easy, right?

A saturated solution is a solution where the solute has dissolved into it at a maximum. No more solute can be dissolved in this saturated state.

In the notes that Mr. Lieberman explained in class, there is a diagram of NaCl dissolving in H2O showing the driving forces that cause the dissolving of this solute, NaCl, into this solvent, H2O (most of the solvents in this unit will be H2O and all of them will be liquids! Awesome!). In the diagram, the H2O molecules, which are polar, attach themselves to the Na+ or Cl- atoms according to polarity. So an H2O molecule's negative pole will attach to the positive Na atom. And an H2O molecule's positive pole will attach to the negative Cl atom. This will pull the crystal-like structures of NaCl apart. This is a demonstration of an ionic solute dissolving by dissociation into its ions. There are two more types: Covalent solutes dissolving by H-bonding to water and covalent solutes dissolving by London dispersion forces (LDF).
This process is carried out instantaneously, it cannot be viewed through a microscope or observed at all, for that matter.

Furthermore, there are three stages to this same solution process explained in further detail here.
  1. Primarily, there is the separation of a solute, and in order of this to happen, the solute's molecules must surpass their intermolecular forces (IMF) and it requires energy, making it endothermic.
  2. Secondly, the separation of a solvent occurs when the solvent overcomes its intermolecular forces. This also requires energy, also making it endothermic.
  3. Thirdly, the interaction of these two substances occurs. An attractive bond forms between the solvent and solute molecules and this releases energy, making it exothermic.
Phenominal! Now we understand the heat exchanges that occur within this process, let's continue!

We continued with the in-class notes and took a look at the factors affecting the solubility.
We know that Like dissolves like, which means that molecules with the same type of intermolecular forces will dissolve in eachother. E.g. dipole-dipole, Hydrogen bonds, and LDF.
Cool, huh?
Tell you what's not cool, that the raise of temperature in these solutions causes more collisions which allows easier access into these crystal structures, allowing for further saturation of a solution.
Finally, there is pressure. Solids and liquids are hardly affected by pressure changes in relation to solutions, but gas, under higher pressure, will have a higher solubility.

Well done, Captain, you have successfully acquired knowledge of solutions and can continue on your path to success. Enjoy your good HEALTH:


The next scribe is Becky N. (Rebecca N.)

Sunday, January 30, 2011

Hess's Law Lab

Hey everone! Friday was another interesting day in Chemistry. After everyone got seated, Mr. Lieberman talked to us about the days activity, which included a Hess's Law Lab. After going over the procedure, we got in our lab groups, put on our visorgogs, and got to work.

First, we made our date tables, which should ideally include two separate areas (for Equation A and Reaction #2) with spaces for two trials. We began Equation A by measureing two strips of magnesium ribbon and recording that in our data table. We then massed a clean dry calorimeter, and remassed it once we added 15 mL of HCl (recording both in the data table, of course). We took the initial temperature of the HCl, and then added a piece of magnesium to the calorimeter. We stirred the piece as it dissolved, and then retook the temperature once it was constant. Once that was over and we recorded all of those temperatures and masses in our data table, we repeated!

Then, it was on to Reaction #2. We remassed the calorimeter (once it was clean and dry), and remassed once we added 15 mL of HCl. To switch things up, we then added about .20 g of magnesium oxide. We recorded the masses of the calorimeter, as well as the actual mass of the magnesium oxide in our data table. Once we added the magnesium oxide in the calorimeter, we stirred until the temperature remained constant. We recorded this temperature and then repeated the whole process!

Once this lab was over, we left chemistry to go enjoy our weekends. Don't forget to work on this lab, though, it's due Tuesday! Good luck to Bobby S, our next scribe, on his first post for Period 6!

Wednesday, January 26, 2011

All About Phases


Today in chemistry class we started out by learning about phase diagrams. They are representations of the state of substances based on the temperature and pressure conditions. The pressure is listed on the y-axis( in mmHg) and the temperature on the x-axis (in degrees celsius). The points on the graph indicate that states are in equilibrium. Point A, the triple point, is a point where all three states are in equilibrium. If a substance is gotten to exactly the right temperature and pressure of its triple point, all three states will be present.


We learned that the state of a substance can be manipulated by using pressure. For example, a tank of propane gas used for grilling is kept at high pressure in order for it to remain in liquid state in the tank before it is needed. However, when the valve is open to get the propane gas to the grill, the pressure is lessened and the propane needed is changed to gas form.


Mr. Lieberman did a demo where he simulated boiling by putting dry ice in a beaker of water. He said that once the pressure in the gas bubbles equals the pressure in the water, vapor will be formed.


Mr. Lieberman also did a demo that proved that pressure affects the state of water and any other pure substance. He put a beaker of water inside a vacuum and started lowering the pressure. The water started boiling within 30 seconds and produced vapor.
Lastly, Mr. Lieberman showed us dry ice in all three states by putting some in a tube and sealing all the holes. He then held this tube into a beaker of water and we watched the dry ice turn into liquid form from its solid state. Also, we saw vapor bubbles frequently during many attempts at perfecting this demo. These vapor bubbles indicated the presence of a hole in the seal of the tube. Finally we saw dry ice in liquid form!
This has been Korri H!!
The next scribe is Katie I.
Don't forget to do the worksheet!

Tuesday, January 25, 2011

Hurts like Steam!


Today in chemistry class, Mr. Lieberman discussed with us how our tables should look like for the lab we did on January 24th, as shown by the image on the left.

The theoretical heat curve that can be observed has two platforms. The first platform is at the bottom left, which is the melting phase where the ice melts into a liquid. This platform only has temperatures from 0 degrees C to approximately 5 degrees C. After this melting phase, it is liquid, where it immediately gains energy and increases in temperature all the way to the boiling point. The boiling point is the second platform. Here, the water is boiled and vaporized into the air at the temperatures 100 degrees C to approximately 101 degrees C.

The amazing section of this lecture was that past beyond the vaporization
point, the temperature of the steam can keep increasing to an infinitely high number. This is equally true for the melting point, for before the ice melts, it can have an infinitely low temperature. Both of these situations is demonstrated by the picture below.


We also learned that during the melting phase \Delta H fusion = kJ/\o is the equation used to determine the heat in order to cause this physical change from solid to liquid. To f
ind the energy that is used to reach the boiling point, this equation must be utilized: q=M x C x \Delta T . And finally, to find the energy that is used to actually turn the water into vapor, this equation must be utilized: \delta H vaporization = KJ/ \o

Stepping aside from Chemistry for a moment, I give you a picture of a small monkey. Attempt to absorb his cute-ness and calculate the percent error of cute-ness absorbed versus the theoretical cute-ness that the monkey gives off.


Mr. Lieberman performed a demonstration where he had a coiled copper tube inside of a flask, which is has water and is on a hotplate. Once the water began to boil, the hot steam went into the copper tube. Under the coiled part of the copper tube, the steam trap, there was a burner that heated the steam substantially in order to prove that steam can be heated to a way higher temperature. This can be seen by the line graph farther above. The steam, however, was able to burn a hole through a sheet of paper and it was able to light a match!

The next scribe is Korri H.

Kickin'!

Monday, January 24, 2011

Watch the Ice MELT and then BOIL


Today in Mr. Liberman's class he started of by giving us five labs back that went on our semester 1 grade Next he handed out a calender of our continuation of Unit 7. Next he told us that there is a couple of Web Assign up for us to do. Also, he told us that the
question set for the second set of Unit 7 may not be done by paper, but by a Web Assign and he told us he'd give us his answer tomorrow. Then we switched seats and have new lab partners. Eventually we learned about our new lab format. Where we are given a sheet with less post-lab questions YES! and no pre-lab. It is a more organized format that helps us come to the conclusion of our labs better this lab was called Heating Curve Lab. The first part of the lab was to write the lab goal which in this case is to use a heating curve to determine the temperature at which a sample of ice melts and boils.
The procedure of this lab is as follows: First we obtained 150 mL beaker of crush iced which we took the initial temperature of, for my group it was -.02 degrees celsius. After we began heating it until it melted which was .1 degrees celsius because this is when the ice started to turn into water. Next we began checking the temperature of the water every minute until it began to boil which was 90.0 degrees celsius and after we raised the hot plate to the highest temperature for 3 more recoreded temperatures. Next we had to make a graph of our data so i made my like the photo above. You use your time as the x coordinate and temperature as the y. Next you had to do the percent error for your boiling temp vs. the actual which is 1oo degrees celsius. To do this you do 90.o + 273 (kelvin) -100.o + 273/ 373 which is -2.7 % error which is not but that is what my data states. This is correct because you do actual -theorectical/ theorectical. So my actual was 90 degrees because that is when ours began to boil. Then you do the same thing for melting so my group was .1 degrees celsius so you do .1 + 273 - 0 -273/ 373= .037 % error. You use 0 because that is the melting point of water. So to answer the first post lab question you give your own boiling and melting point of water. To answer the second you explain how you got it and, finally for the third you explain what you may have done wrong like in my case where I got -2.7 % error. Well that is about is the next scribe is Emillio I.

Sunday, January 9, 2011

Heat of Combustion

Today was a normal friday in chem class. After we all asked matt for a cupcake, Mr. Lieberman began to explain the lab we were about to do.

We did a lab called "Heat of Combustion". The purpose of this lab was find the amount of heat that it take to burn hydrocarbon. First we were to find that mass of the index card and the mass of the candle. Then we were to measure about 100 mL of water and record the volume. Then we poured the water into the calorimeter. We took the temp of the water and recorded it in our data table. Then we lit the candle and heated the water. When the temp of the water was at about 35 degrees C, we blew out the candle. Then we recorded the highest temp that the water got to. lastly, we recorded the final mass of the candle and the index card. My data table looked like this...

Mass of Candle: 78.28g

Mass of Index Card: 2.24g

Volume of Water: 99.2 mL

Temp of Water: 21.22 degrees C

Highest temp of Water: 35.2 degrees C

Final mass of candle: 78.07g

Final mass of index card: 2.28g

There are 12 post lab questions that are due on Tuesday. They are not too difficult if you simply think about them and apply your data.

After we had completed the lab, we took some notes. We learned how to calculate the change in H for the reaction. The equation that you use is ... ΔH (reaction) = ΣΔHfinal(products) - ΣΔHfinal(reactants).

****Remember that H(final) for an element in its standard state is 0****
Here is an example of a problem using this equation.

CALCULATE THE ΔH FOR THE REACTION
4NH(3) + 7O(2) --> 4NO(2) + 6H(2)O

First you have to look in your textbook or online and find the given values for Σ.
NH(4) --> -46KJ/mol (multiply by 4)

O(2) --> 0KJ/mol (multiply by 7)

NO(2) --> 34KJ/mol (multiply by 4)

H(2)O --> -286 KJ/mol (multiply by 6)

Multiply all of the values of Σ by however many moles of it is given in the problem. Then take the multiplied values and put them in the equation. You should get...

(-1716 + 136) - (0 + -184) which equals -1396.

Your answer is is that the ΔH(reaction) = -1396

Have a nice weekend!! The next scribe is... wait. All the name are crossed off. Ummm ill ask Mr. Lieberman on Monday.


Friday, August 27, 2010

Safety Part 2

Today's class we continued our discussion on safety and started to prepare for our first lab. We watched another clip from the ACS safety video. This shorter clip had to do with good lab techniques. There are several points that I think are worth highlighting.

1. The video made a point of telling us that it is always smartest to pour liquids from large stock bottles into smaller containers that are easier to manage in the lab.

Ahh...the memories
2. The point of mixing acids is an important one but not done very often in our class. Acids should always be poured into water, not the other way around. "Do what you outta pour the acid into the watta" I know lame but I learned that in high school myself.

3. The video also commented on how we always pour out of stock bottles but never back in. If you have too much of a chemical dispose of it properly but do not put it back into the stock bottle.

4. Remember never mouth pipet!!

After that we briefly discussed how to do the pre-lab for Monday's Observation Lab. We will discuss the data tables on Monday also. Lastly we briefly talked about the unit objectives that were handed out. These are just the main topics for the current unit. They will be handed out at the beginning of each unit. Remember that if you missed a handout for an absence please go to our moodle site to download them. The last thing we did was took our safety assessment on WebAssign.

V-I-C-T-O-R-Y!!!
Have a great weekend and go Titans!!
Oh yeah our first student scribe is...Kathryn J

Thursday, August 26, 2010

Achtung Baby!!

Today was all about safety. Our discussion centered around the Flinn Scientific Safety Contract. Also we watched clips from the ACS safety video. The first part of the discussion talked about appropriate laboratory attire and behavior. The movie clips were hilarious but informative as Mr. Lieberman was able to link them to our classroom. He showed us the location of all the safety equipment and some special safety considerations for our classroom. The second part of the discussion talked about what to do in case of an emergency our an accident in the laboratory.


Mr. Lieberman also showed us some cool demos that go along with the discussion. The first demo involved "Dave" the mannequin and acetone. This showed us how ordinary household substances can be dangerous in the lab and also how "horseplay" can result in serious injury. The second demo involved an egg and concentrated sulfuric acid. This showed us how sensitive the tissue in our eyes is and how quickly an eye injury could occur. The last demo was the vapor ramp demo. This showed the volatility of organic compounds and how we need to be careful with them near upon flames as the vapor is extremely flammable.

Now that we are all experts on safety...let's dance!!


Tuesday, August 24, 2010

Creating A Post

The video below will help you with creating a post below


There are two types of posts that you will create: 
   1. Scribe Post (scribe):  This is a daily entry of what happened in class that day
  2.   On My Mind (OMM):  This is an entry that you submit at any time to share something that is on your mind.

Every post should have at least three labels:
  1.  "scirbe" for a scribe post or "OMM" for an on my mind post
  2.  your username
  3.  the topic addressed in the post

Thursday, August 19, 2010

Digital Ethics

Blogging is a very public activity. Anything that gets posted on the internet stays there. Forever. Deleting a post simply removes it from the blog to which it was posted. Copies of the post may exist scattered all over the internet. That is why we are being so careful to respect your privacy and using first names only.

There are four principles from which we will operate as we create digital content that will be posted on the internet.


1.  Students using blogs are expected to treat blogspaces as classroom spaces. Speech that is inappropriate for class is not appropriate for our blog. While we encourage you to engage in debate and conversation with other bloggers, we also expect that you will conduct yourself in a manner reflective of a representative of this school.


2.  Never ever give out or record personal information on our blog. Our blog exists as a public space on the Internet. Don’t share anything that you don’t want the world to know. For your safety, be careful what you say, too. Don’t give out your phone number or home address. This is particularly important to remember if you have a personal online journal or blog elsewhere.


3.  Again, your blog is a public space. And if you put it on the Internet, odds are really good that it will stay on the Internet. Always. That means ten years from now when you are looking for a job, it might be possible for an employer to discover some really hateful and immature things you said when you were younger and more prone to foolish things. Be sure that anything you write you are proud of. It can come back to haunt you if you don’t.


4.  Never link to something you haven’t read. While it isn’t your job to police the Internet, when you link to something, you should make sure it is something that you really want to be associated with. If a link contains material that might be creepy or make some people uncomfortable, you should probably try a different source.


- Parts of this post were taken from a digital ethics post by Darren Kuropatwa.